Registering Browser AI Tools With WebMCP and TypeScript
When a browser extension or built-in assistant wants to help a user inside a web app, it normally falls back to reading screenshots or walking the DOM tree and clicking buttons by CSS selector. Developers usually handle that by adding extra data-testid attributes or maintaining a separate backend Model Context Protocol (MCP) server that duplicates half of the front-end's filter and form state. In this guide I walk through the client-side alternative: registering typed JavaScript tools directly inside your Vue or TypeScript app using WebMCP and document.modelContext.
If you are looking for the higher-level product and governance trade-offs rather than the browser code, I also wrote a companion architecture guide on when to use backend MCP servers vs. browser WebMCP tools over on Innovi Pro.
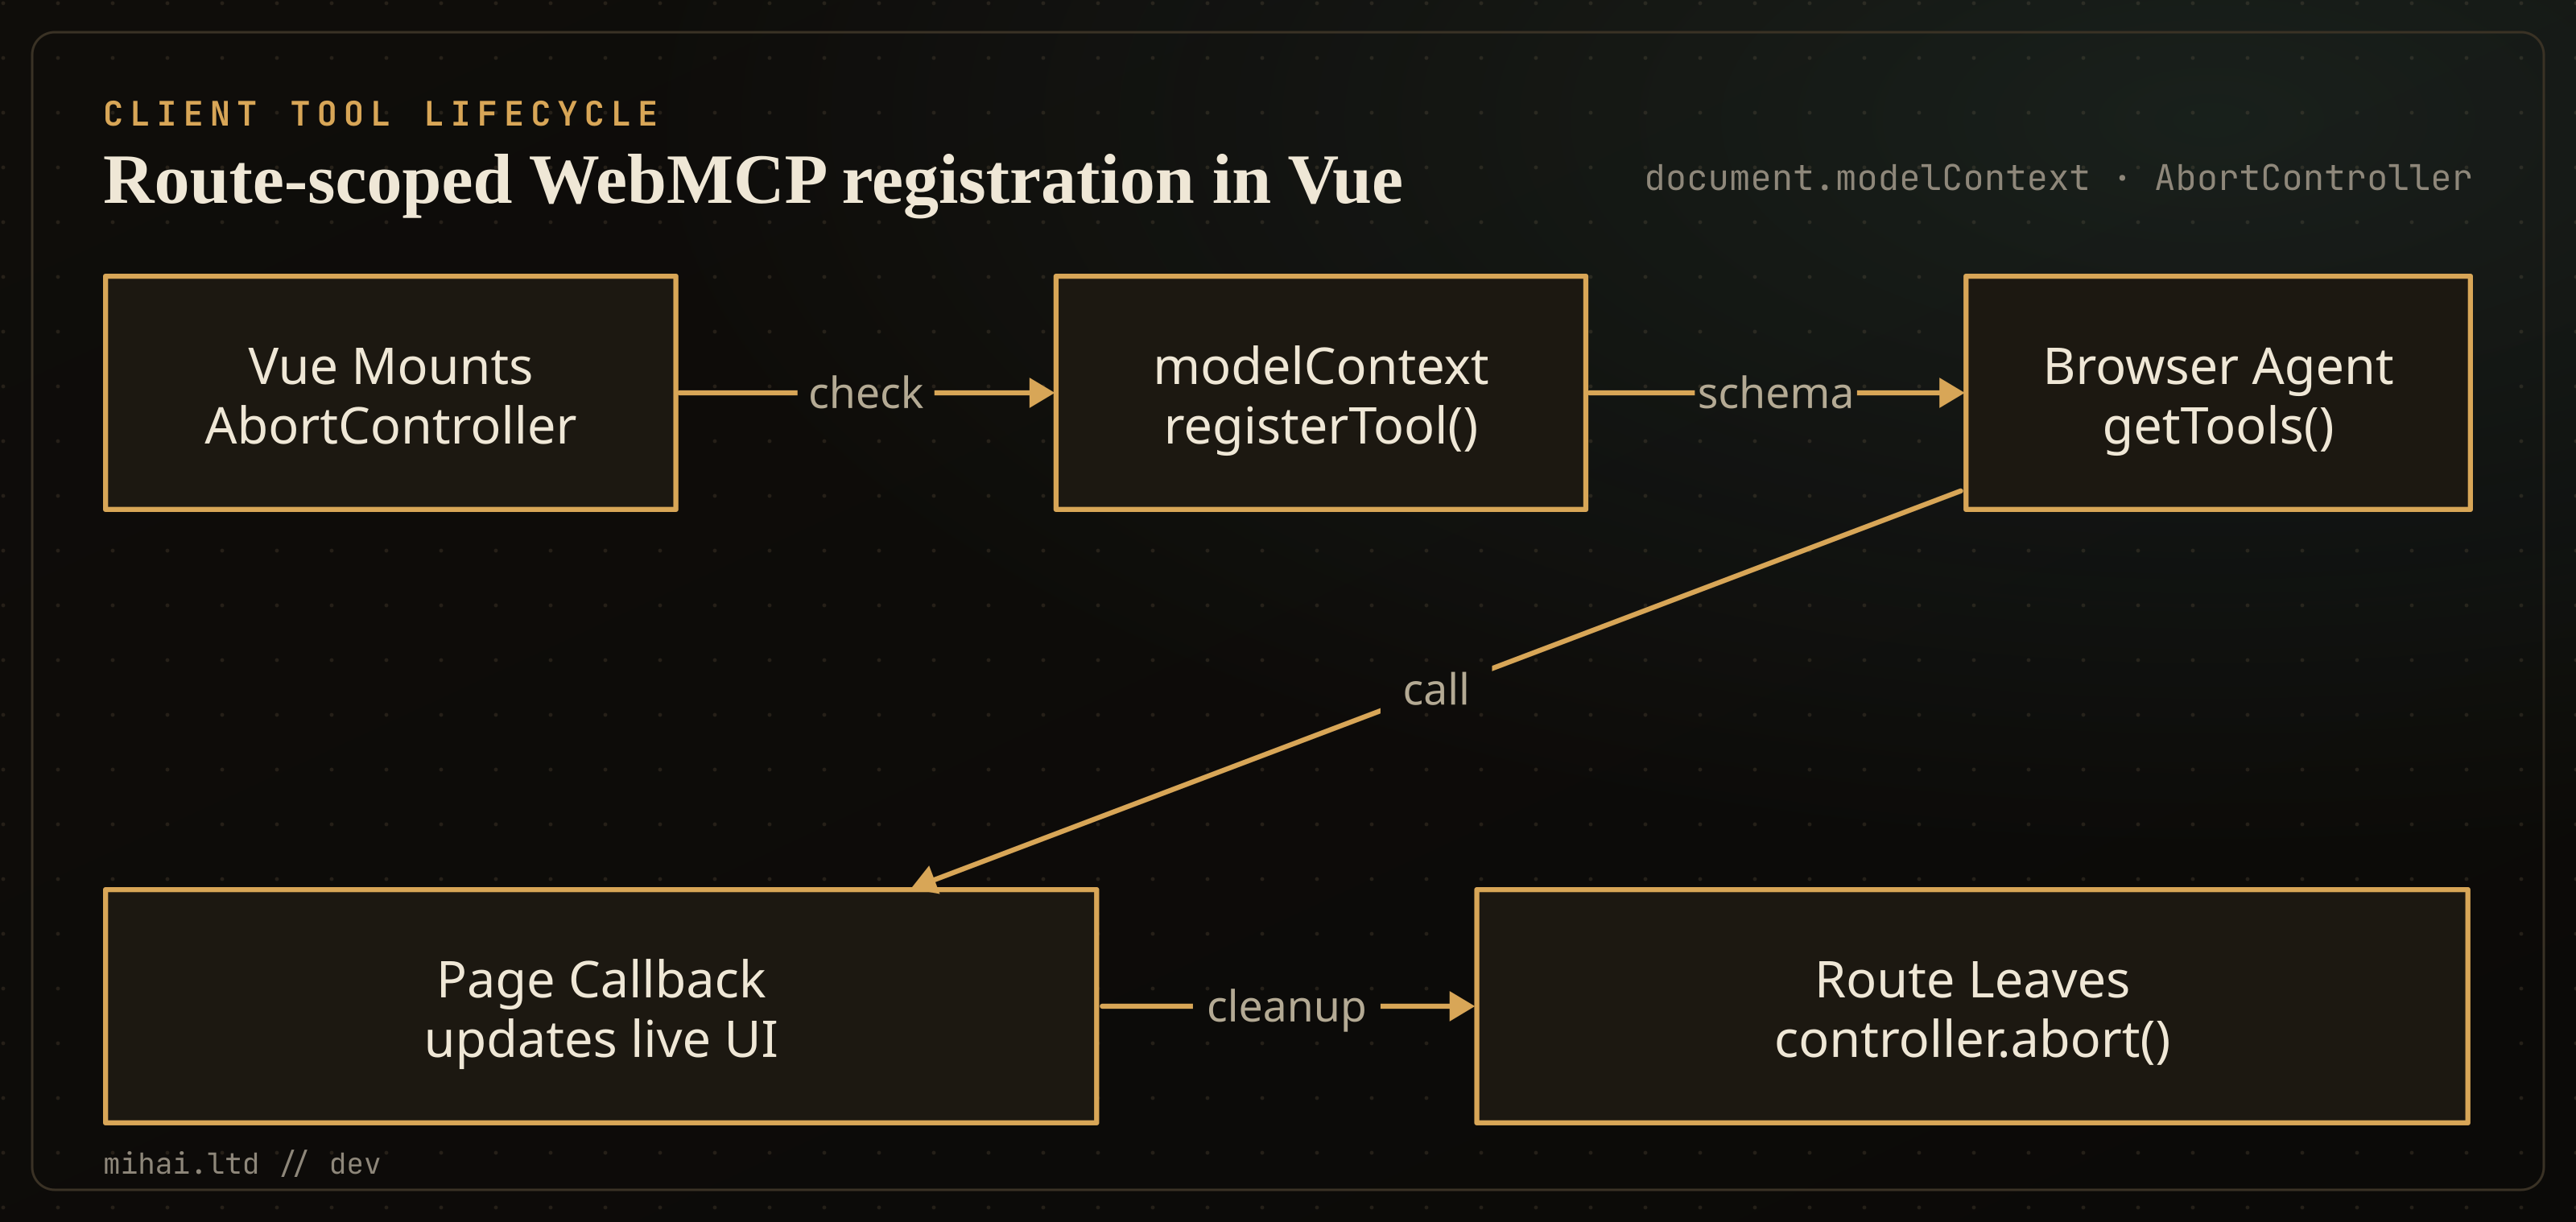
How WebMCP turns existing UI logic into tools
The W3C WebMCP specification draft exposes document.modelContext, which works like a lightweight in-page tool registry. Rather than forcing an agent to guess which dropdown opens a date filter, your page calls document.modelContext.registerTool() with a name, a plain description, a JSON Schema for arguments, and an execute callback that calls the exact client-side function your button already invokes.
Because the callback runs inside the active tab, two annoying integration problems disappear:
- You keep your existing auth session. API requests inside
executecarry the user's normal cookies or bearer headers, so you do not have to stand up a separate OAuth bridge just to let an assistant filter a table. - The UI stays in sync with the agent. When
executeupdates reactive state in Vue or React, the user watches the interface change immediately and stays in control before any final checkout or form submission happens.
The repository also hosts a separate exploratory explainer for declarative HTML <form> attributes such as toolname and tooldescription, though the formal specification focuses on the imperative document.modelContext API because real single-page apps need tools to appear and disappear dynamically as routes change.
Progressive enhancement with a Vue composable
According to the WebMCP implementation status, Origin Trials are currently running in Chrome 149 and Edge 150 alongside support in ChatGPT Desktop, while Mozilla and WebKit still have open standards positions. That means document.modelContext will be undefined for many visitors today, so every registration path needs a quiet feature check and cleanup hook.
TypeScript definitions ship in the webmcp-types package referenced in the official README, or you can declare the small interface surface locally if you want zero extra runtime dependencies. The most important design rule from Chrome's WebMCP documentation is keeping the registered tool list small and scoped to the active screen, because every schema eats prompt tokens and increases tool-selection mistakes.
Here is a clean Vue 3 or Nuxt composable that registers a tool when a component mounts and unregisters it automatically via AbortController when the user navigates away:
import { onBeforeUnmount, onMounted } from "vue";

interface WebMcpTool {
  name: string;
  description: string;
  inputSchema?: Record<string, unknown>;
  execute: (input: Record<string, unknown>) => Promise<unknown> | unknown;
}

interface ModelContextApi {
  registerTool: (
    tool: WebMcpTool,
    options?: { signal?: AbortSignal; exposedTo?: string[] },
  ) => Promise<void>;
}

export function useWebMcpTool(tool: WebMcpTool) {
  let controller: AbortController | null = null;

  onMounted(async () => {
    const ctx = (document as Document & { modelContext?: ModelContextApi })
      .modelContext;
    if (!ctx) return;

    controller = new AbortController();
    try {
      await ctx.registerTool(tool, { signal: controller.signal });
    } catch (err) {
      // Permissions-Policy or cross-origin restrictions reject with NotAllowedError.
      console.warn(`WebMCP registration skipped for ${tool.name}:`, err);
    }
  });

  onBeforeUnmount(() => {
    controller?.abort();
    controller = null;
  });
}
Wrapping registration inside onMounted avoids server-side rendering mismatches in Nuxt where document does not exist on the Cloudflare Worker or Node server, and aborting the signal inside onBeforeUnmount guarantees stale route tools vanish from the browser registry immediately.
Wiring a real interactive tool without breaking manual users
Suppose you have an interactive cost calculator or clinical schedule filter where a user normally drags three sliders or checks two boxes. You can keep the standard form inputs intact for everyone, then attach a single composable call inside <script setup> so WebMCP-capable browsers can inspect and set those same reactive refs:
useWebMcpTool({
  name: "compare_saas_vs_custom",
  description:
    "Updates the 5-year SaaS vs. custom cost calculator inputs and returns the estimated crossover month.",
  inputSchema: {
    type: "object",
    properties: {
      startUsers: { type: "number", description: "Active users in month 1" },
      endUsers: { type: "number", description: "Projected users at year 3" },
      monthlyPerUser: {
        type: "number",
        description: "Base SaaS price per seat in USD",
      },
    },
    required: ["startUsers", "endUsers", "monthlyPerUser"],
  },
  async execute(input) {
    startUsers.value = Number(input.startUsers);
    endUsers.value = Number(input.endUsers);
    monthlyPerUser.value = Number(input.monthlyPerUser);

    return {
      content: [
        {
          type: "text",
          text: JSON.stringify({
            saasTotal: saas5YearTotal.value,
            customTotal: custom5YearTotal.value,
            crossoverMonth: crossoverMonth.value,
          }),
        },
      ],
    };
  },
});
Notice what execute does not do: it does not invent a hidden API call or bypass client validation. It drives the exact reactive state already backing the visible SVG chart and summary table, so a person watching the tab sees the numbers update right in front of them.
Testing tools locally in Chrome
To try your registered tools without deploying an Origin Trial token yet, open about:flags#enable-webmcp-testing in Chrome 149 or newer and turn the flag on. Once restarted, you can inspect and invoke your own page tools directly from the DevTools Console or Chrome's Application panel:
// Inspect tools currently active on the page
const tools = await document.modelContext.getTools();
console.log(tools.map((t) => ({ name: t.name, inputSchema: t.inputSchema })));

// Execute one directly with test arguments
const result = await document.modelContext.executeTool(
  "compare_saas_vs_custom",
  {
    startUsers: 80,
    endUsers: 220,
    monthlyPerUser: 95,
  },
);
console.log(result);
Because getTools() and executeTool() work directly for in-page and extension harnesses, you can also exercise your WebMCP tool contracts inside Playwright integration tests rather than relying on fragile UI click scripts alone.
Permissions Policy, iframes, and backend boundaries
Because third-party widgets and embedded frames live inside modern web apps, WebMCP ties tool discovery to the browser's Permissions Policy. By default, registerTool() works in top-level documents and same-origin frames, while cross-origin iframes fail with NotAllowedError unless the parent frame grants access explicitly:
<iframe src="https://assistant.example.com/" allow="tools"></iframe>
If you want to disable browser tool registration across an entire sensitive route such as an admin billing screen, send Permissions-Policy: tools=() from your reverse proxy or Nuxt route rule. When you intentionally share tools across trusted frames in the same tree, pass exposedTo: ["https://trusted-origin.example"] to registerTool() and fromOrigins to getTools() so unrelated third-party embeds stay locked out.
One final rule applies even when WebMCP works smoothly: keep real tenant and role authorization on your server and database. Client-side tools run inside a browser the user controls, so any API endpoint invoked by a WebMCP tool still needs proper session checks and PostgreSQL Row-Level Security (RLS) underneath.
Where to go next
WebMCP fits best as a clean layer over interactive screens, while backend MCP servers and durable workflows still own background sync, scheduled jobs, and multi-system automation. If your team is designing that split across an existing SaaS or enterprise portal, read the backend MCP vs. browser WebMCP architecture breakdown on Innovi Pro. When you are ready to build or review the architecture, take a look at our MCP and AI integration engineering services, commission a software architecture audit, or request a scoping call.